How to reduce Docker images size
It’s easy to make Docker images bigger than needed. This has a negative impact in both push and pull time but it may also be hiding additional problems you should address before they become critical.
In this post I will explain you three techniques to help you slim down your Docker images:
Chain commands when possible
Whenever possible, chain commands instead of running several RUN instructions one after the other. Docker works using layers and each single instruction creates a layer. Even if an instruction removes leftovers of the previous one, the corresponding layer still takes that extra space.
Prefer chaining commands to multiple RUN instructions.
Let’s see this with an example. Take this small Dockerfile that downloads a zip file from Github and uncompresses it.
FROM alpine:3.12.0

RUN wget https://github.com/caffco/get-video-duration/archive/v3.0.0.zip
RUN unzip v3.0.0.zip
RUN rm v3.0.0.zipCode language: Dockerfile (dockerfile)
You will notice that at the end we remove the compressed file so the resulting image should be quite small, right? Well, it takes 5.54Mb but if we remove the size taken by the base Alpine image (5.32Mb) we can see that these lines make the resulting image bigger by 225Kb. Can we do better? Let’s try to chain the commands.
FROM alpine:3.12.0

RUN wget https://github.com/caffco/get-video-duration/archive/v3.0.0.zip && unzip v3.0.0.zip && rm v3.0.0.zipCode language: Dockerfile (dockerfile)
And the result? The new image only takes 5.47MB. Subtracting again the size of the base image we can see that this new instruction (layer) only takes 154Kb.
We saved 70kb, almost a third of the size of the size we introduced in the previous example and the resulting image filesystem is identical.
Leverage multi-stage builds
If you are new to Docker you might not know that you can use intermediate images to do some heavy setup while keeping the resulting image small. This is particularly useful when you don’t control the leftovers of the setup process.
Use intermediate images when you can’t control the leftovers.
Let’s see this with an example. Take this small Dockerfile that clones a git repo from Github and builds it.
FROM node:14-alpine3.12

RUN \
  apk add --no-cache git && \
  git clone https://github.com/caffco/get-video-duration.git && \
  apk del git && \
  yarn --cwd get-video-duration --frozen-lockfile && \
  yarn --cwd get-video-duration build && \
  mv get-video-duration/dist dist && \
  rm -rf get-video-durationCode language: Dockerfile (dockerfile)
We’ve been extra careful this time and are chaining together all commands. We also took care of removing git after finishing using it and we even removed the source code after we built it! So there are no leftovers, right?
This new layer takes 513Mb and in should only have the build results which are much, much, smaller (around 10kb) so there are some leftovers for sure…
Don’t worry about finding leftovers at this point. Next section is focused on just that.
Let’s use an intermediate image to build the library and forget about leftovers: intermediate image’s layers are lost and don’t take part of the resulting image’s layer stack. To do so we use the FROM <base> AS <intermediate-image-name> syntax:
FROM node:14-alpine3.12 AS intermediate

RUN \
  apk add --no-cache git && \
  git clone https://github.com/caffco/get-video-duration.git && \
  yarn --cwd get-video-duration --frozen-lockfile && \
  yarn --cwd get-video-duration build

FROM node:14-alpine3.12

COPY --from=intermediate /get-video-duration/dist /distCode language: Dockerfile (dockerfile)
Note that in this example we are not taking care of leftovers at all. That’s ok, intermediate image will be lost forever after build finishes so we don’t need to care about the leftovers it generate.
How big is this new layer? Just 10kb. We managed to remove 99.99% of the layer’s size.
Explore images with Dive
So you might wonder… why did the image of the previous section take so much space? Worry not as there’s a great tool called Dive which makes it easier to find where are leftovers and wasted space.
Use Dive to find where is the wasted space.
This tool allows to explore the filesystem of each layer in an image and highlights those files added or modified. It also hints the space you can save if you optimize the image but it gives no further advice on how to do so.
Let’s try to understand what happened before, so pick the previous, big, Dockerfile:
FROM node:14-alpine3.12

RUN \
  apk add --no-cache git && \
  git clone https://github.com/caffco/get-video-duration.git && \
  apk del git && \
  yarn --cwd get-video-duration --frozen-lockfile && \
  yarn --cwd get-video-duration build && \
  mv get-video-duration/dist dist && \
  rm -rf get-video-durationCode language: Dockerfile (dockerfile)
Build it and analyze it with Dive:
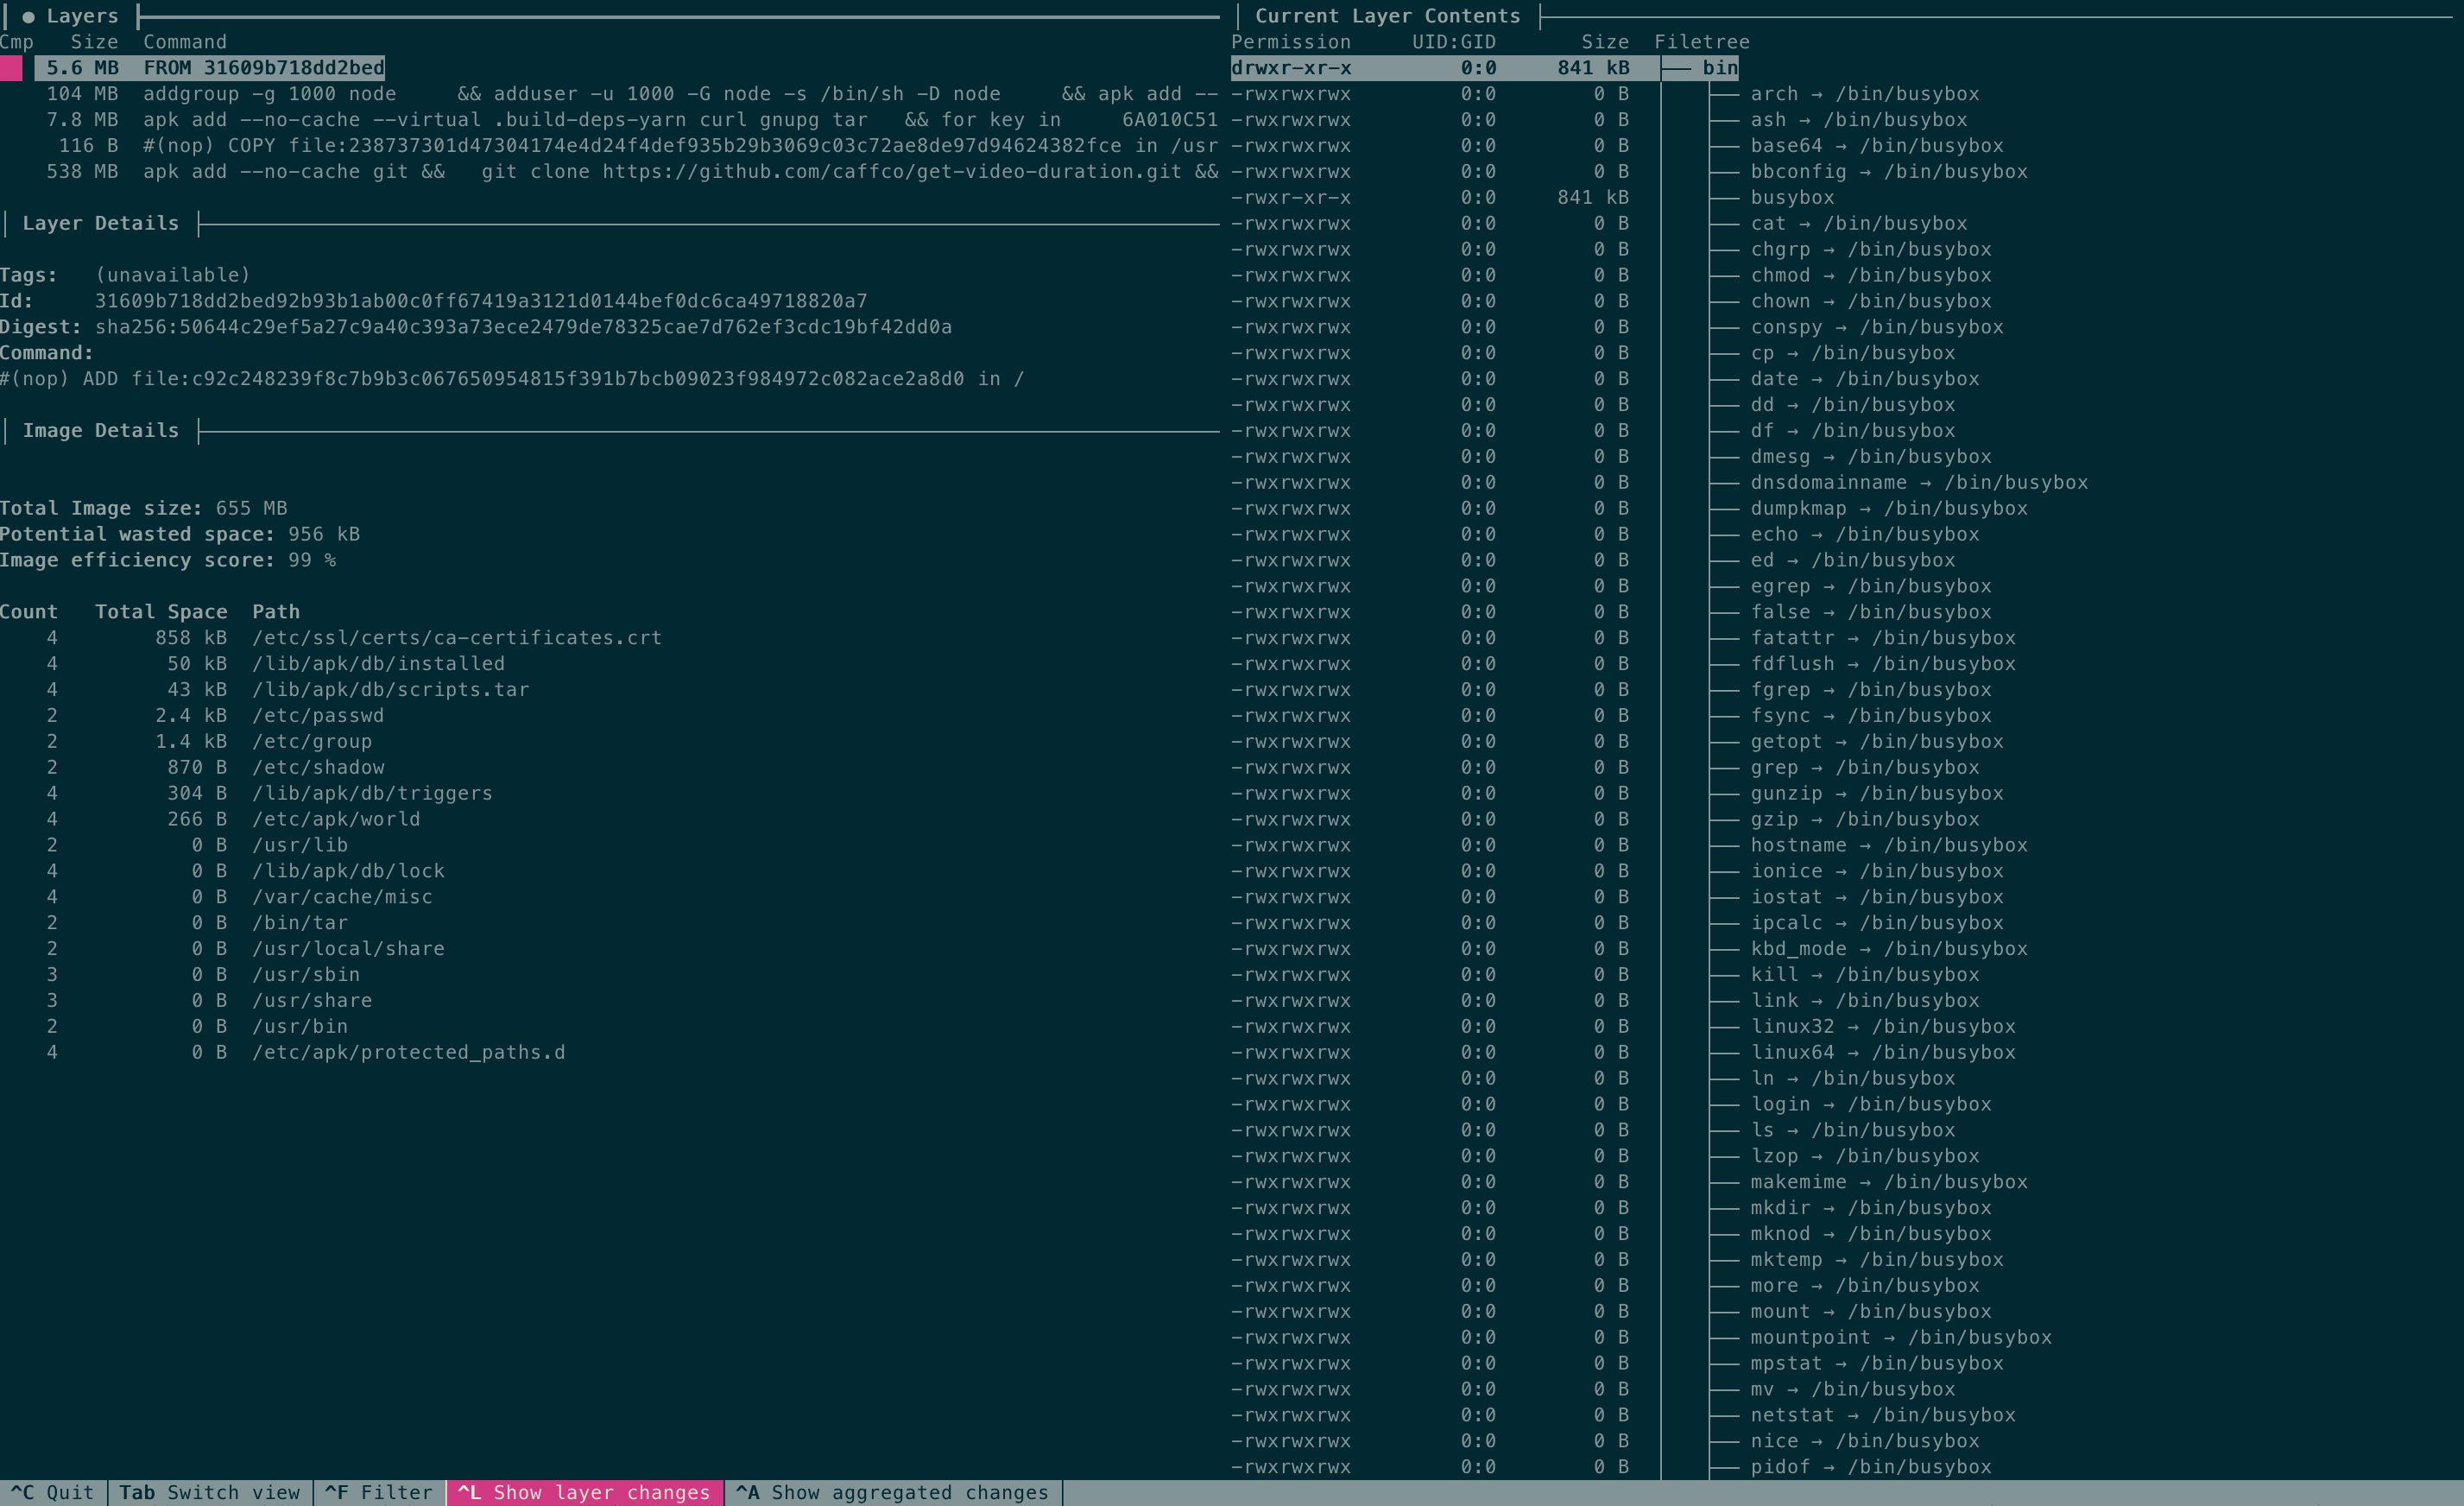
Sure Dive interface might look scary. It’s composed by 4 panel, starting from top left and going counter-clock-wise:
- The list of layers conforming he image.
- Details of currently selected layer.
- Details of the image (including potential space wasted).
- Contents of currently selected layer filesystem.
You can use the arrows to select a different layer and switch between layer list and filesystem tree using the tab key. In the filesystem tree you can use the shortcut control+space to collapse the entire tree or just space to toggle a single folder tree.
Since Dive highlights the folders and files added or modified, it’s quite easy to spot changes in unexpected places.
Focusing on this image, we can see that it has 5 layers. The first 4 are quite small compared to the last one. Actually, the only layer we are responsible of is the last one so let’s move to that layer and check out the filesystem tree.
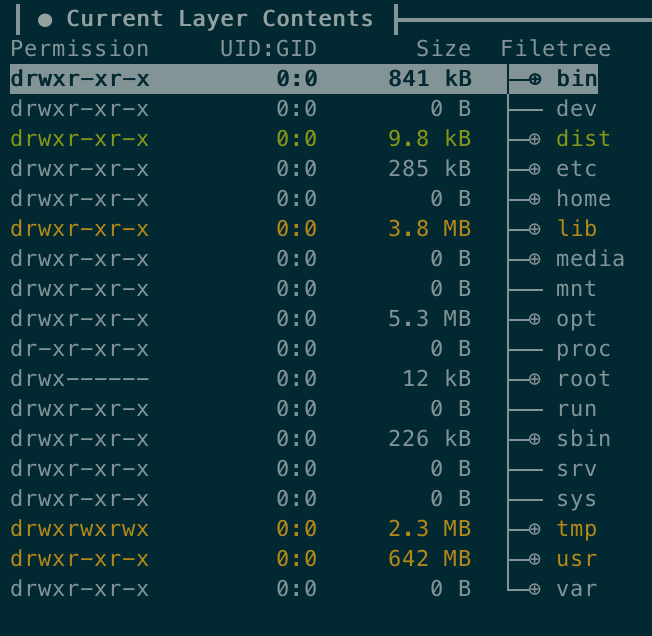
Notice something weird? The /dist folder is new and takes around 10kb. There are some changes in /lib and /tmp folders, too, which are not too big but worth cleaning up. However, /usr is extremely large compared to the rest of folders. If we take a look at it we’ll realize what happened pretty soon…
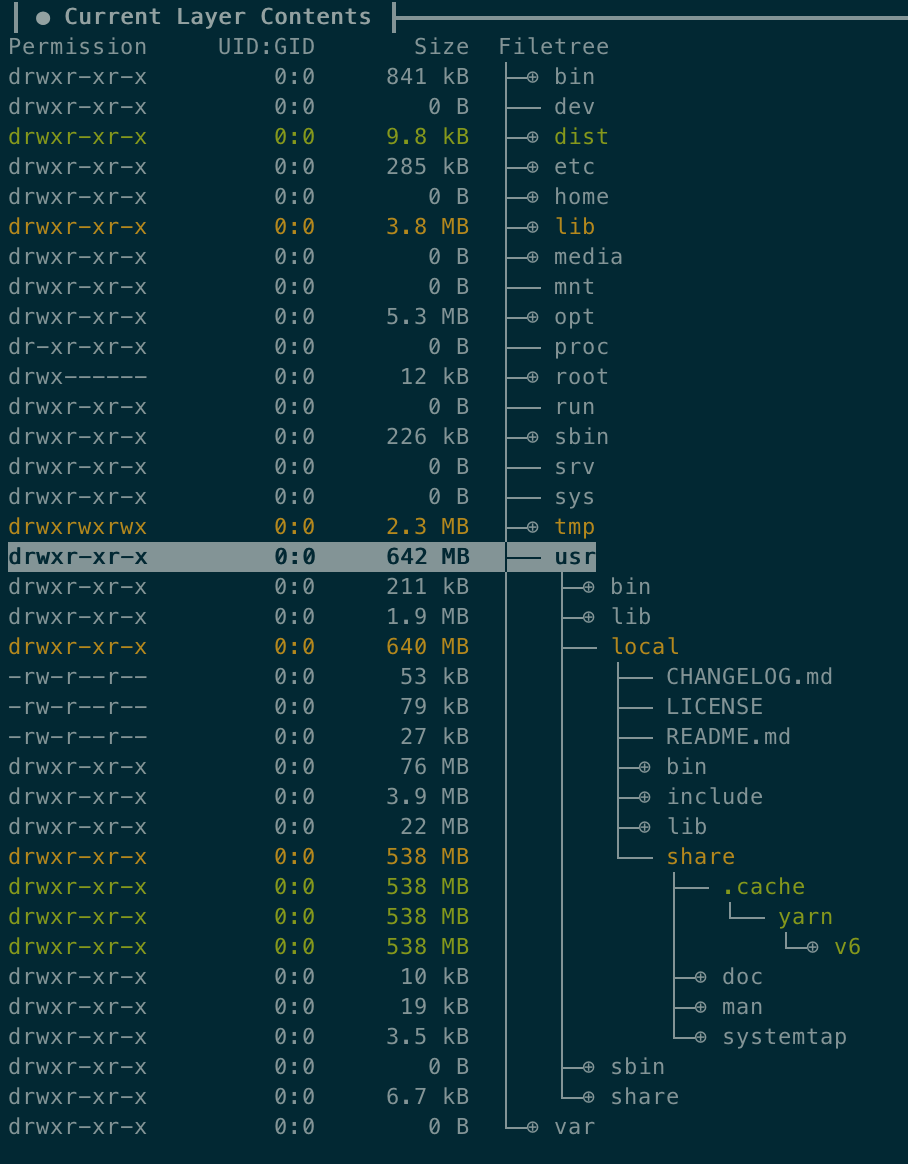
/usr/local/share/.cache/yarn/v6 takes most of the spaceWe forgot to remove yarn cache! We could have spend hours trying to understand what was happening but using Dive this is just a matter of minutes.
Measuring size of Docker images
If you wonder how I measured the size of the Docker images for this post, here’s the snippet I used to get it.
docker build -f <PATH_TO_DOCKERFILE> -t <IMAGE_TAG> . && docker image inspect <IMAGE_TAG> --format='{{.Size}}' | numfmt --to=iec-i --format=%.3fCode language: Bash (bash)It will print on stdout the size of the built image in a human readable format, picking the appropriate multiple using numfmt.
No replies on “How to reduce Docker images size”