This post was published 4 years ago so it may be outdated.
When you build a Docker image you will notice a “transferring context” step in the output (“Sending build context to Docker daemon” in older Docker versions) that can take a lot of time. This step is just Docker copying local files so keeping those to the minimum will make this step faster.
This post was published 6 years ago so it may be outdated.
It’s easy to make Docker images bigger than needed. This has a negative impact in both push and pull time but it may also be hiding additional problems you should address before they become critical.
In this post I will explain you three techniques to help you slim down your Docker images:
This post was published 12 years ago so it may be outdated.
This is just a very short introduction to Vagrant, if you already know a little bit about Chef and Berkshelf you’ll find it disappointing.
We previously saw how to install and use Vagrant but we didn’t talk about how to install applications to that machine. You can use the traditional way and install everything manually compiling it or through a package manager but if you wonder if there is a better way to do this, you’re lucky: there is.
Vagrant supports multiple provisioners. A provisioner is a utility that allows you to automatically install software and change configuration. Although Vagrant supports a bunch of provisioners this post is focused only on Chef.
If you take a look at your Vagrantfile you’ll see this fragment of code near line 90.
# You may also specify custom JSON attributes:
chef.json = { :mysql_password => “foo” }
end
[/ruby]
This is the block telling Chef provisioner what to install and giving some settings to the installer. You can see three different parts in this chunk of code:
Gives Chef some settings it will use when installing the applications, in this example you ask Chef yo use “foo” as password for MySQL.
Cookbooks, roles and data bags
You’ll probably wondering what are those things. Cookbooks are scripts defining the requirements and steps to install to set up some software. A cookbook can be as simple as adding a file to your .bash_profile or as complex and installing NodeJS by installing gcc, git, cloning NodeJS source’s git repository, compiling and then installing it. But again, don’t worry, most of the times you will use a third-party cookbook. A cookbook may contain more than one installation script (usually referred as recipe).
Roles are a way to set up some common settings for different machines. A simple example: imagine you are developing a platform where there are nodes serving content to users and nodes performing maintenance tasks, but all of them use Ruby. You would create a role “myplatform-node” which tells Chef to install Ruby, RVM and set up the default Ruby version to the version you want to use. If you decide to upgrade to a new Ruby version you just update your role and reprovision the machines. That is much easier and faster than the alternative: manually adding Ruby, RVM and Ruby’s version setting to Vagrantfile of each one of your nodes (note that there are lots of solutions to this situation).
Data bags are global variables that are can be loaded by a recipe.
Recipes
So we know the basic concepts of Chef and we want to install something in our Vagrant machines, what do we have to do know? Search a cookbook containing the recipe to install the software we want, download it, put it in the cookbooks folder and then provision the machine.
When everything is in its place, you just run:
[bash]
vagrant up
vagrant provision
[/bash]
And Vagrant will start the machine and install everything. Note that the first time you run vagrant up Vagrant will provision the machine, but after that first start you’ll have to manually ask Vagrant to provision it.
Sounds pretty easy, right? Well, think about it. If you have, let’s say, 2 different computers, you’ll have to copy the cookbooks in the right folder in both machines. That’s not a big issue. But what if we talk about our workplace. Distributing those files to each mate’s computer is not the best idea.
But this is just the initial deployment. What if we want to use an updated version of a recipe? We would have to redistribute again the cookbooks. The chance of not being properly distributed is so high that some people have developed a better way to do this: Berkshelf.
Berkshelf
Berkshelf solves this distribution problem with a very simple approach: in a config file named Berksfile you define the URL of the repository where cookbooks will be searched and a list of cookbooks to search and download (optionally you can indicate the version and even a custom path to where the cookbook is located). Berkshelf will process the config file and download (or update) the cookbooks specified in it. When you provision your Vagrant machine Berkshelf will be hooked so instead of provisioning using the paths specified in Vagrantfile, Berkshelf will handle the location of the cookbooks.
First line tells Berkshelf where should it look for cookbooks. The other lines tell Berkshelf which cookbooks should download and which version.
And so, by just distributing the Vagrantfile and Bersfile, anybody will be able to provision the machine with the desired version of desired applications.
Setting up Berkshelf
Assuming you’ve installed Vagrant, you’ll have to install Berkshelf and Vagrant Berkshelf plugin. Then you’ll have to add this line to your Vagrantfile to enable Berkshelf:
This post was published 12 years ago so it may be outdated.
A couple of months ago I switched from Bash to ZSH. It took me a couple of minutes to know that I wouldn’t go back. These are some of the reasons that made me take that decision.
Auto-correction
ZSH auto-correction
Don’t you misspell commands sometimes? I do.
When ZSH can’t find the command I write it offers me suggestions, usually being the command I actually wanted to use. For instance if we write clar it will suggest us clear, and it will probably be suggesting the right command.
Auto-completion
Browsing ZSH auto-completion results
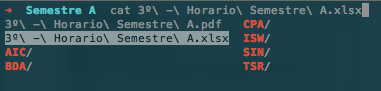
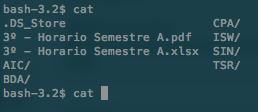
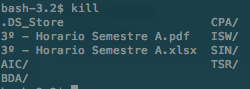
Bash auto-completion
I find auto-completion extremely useful. Bash just lists the files in the current directory. ZSH changes its suggestions depending on the command written.
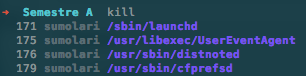
Let’s image we write kill, ZSH will show the list of running processes rather than the list of files in the current directory. If we write cd and press <tab> then ZSH will show us just the list of folders in the current directory.
This capability can be improved via plugins, making ZSH capable of auto-completing more precisely other programs.
Did I say that you can actually browse the list of suggested terms? Yes, you can.
Git plugin
What is nicer than having local branches auto-completion? Having remote origins and remote branches auto-completion! And even more, you can show the current branch next to the current directory. Really nice features if you work with Git.
Other out-of-the-box useful features
Floating point math: I don’t always do math in the shell, but when I do, I need floating point numbers. To do floating point math in Bash you need external applications (bc, for instance). Floating point math works out-of-the-box in ZSH.
Expand variables: write a variable, press <tab> and see the value of that variable.
Global aliases: you can create aliases that work not just at the beginning. Pretty useful if you use to pipe outputs.
Easily enhanced
Want to show how much time took a command to finish? Piece of cake with ZSH, not so easy with Bash.