This post was published 11 years ago so it may be outdated.
Last week I set up HTTPS on this site with CloudFlare’s Flexible SSL so today I’m writing about how did I set it up and what steps you should follow to do so, but first of all let me explain exactly what is CloudFlare Flexible SSL and how it can be free and set up on any website without setting up any SSL certificate. Read more →
This post was published 12 years ago so it may be outdated.
This is just a very short introduction to Vagrant, if you already know a little bit about Chef and Berkshelf you’ll find it disappointing.
We previously saw how to install and use Vagrant but we didn’t talk about how to install applications to that machine. You can use the traditional way and install everything manually compiling it or through a package manager but if you wonder if there is a better way to do this, you’re lucky: there is.
Vagrant supports multiple provisioners. A provisioner is a utility that allows you to automatically install software and change configuration. Although Vagrant supports a bunch of provisioners this post is focused only on Chef.
If you take a look at your Vagrantfile you’ll see this fragment of code near line 90.
# You may also specify custom JSON attributes:
chef.json = { :mysql_password => “foo” }
end
[/ruby]
This is the block telling Chef provisioner what to install and giving some settings to the installer. You can see three different parts in this chunk of code:
Gives Chef some settings it will use when installing the applications, in this example you ask Chef yo use “foo” as password for MySQL.
Cookbooks, roles and data bags
You’ll probably wondering what are those things. Cookbooks are scripts defining the requirements and steps to install to set up some software. A cookbook can be as simple as adding a file to your .bash_profile or as complex and installing NodeJS by installing gcc, git, cloning NodeJS source’s git repository, compiling and then installing it. But again, don’t worry, most of the times you will use a third-party cookbook. A cookbook may contain more than one installation script (usually referred as recipe).
Roles are a way to set up some common settings for different machines. A simple example: imagine you are developing a platform where there are nodes serving content to users and nodes performing maintenance tasks, but all of them use Ruby. You would create a role “myplatform-node” which tells Chef to install Ruby, RVM and set up the default Ruby version to the version you want to use. If you decide to upgrade to a new Ruby version you just update your role and reprovision the machines. That is much easier and faster than the alternative: manually adding Ruby, RVM and Ruby’s version setting to Vagrantfile of each one of your nodes (note that there are lots of solutions to this situation).
Data bags are global variables that are can be loaded by a recipe.
Recipes
So we know the basic concepts of Chef and we want to install something in our Vagrant machines, what do we have to do know? Search a cookbook containing the recipe to install the software we want, download it, put it in the cookbooks folder and then provision the machine.
When everything is in its place, you just run:
[bash]
vagrant up
vagrant provision
[/bash]
And Vagrant will start the machine and install everything. Note that the first time you run vagrant up Vagrant will provision the machine, but after that first start you’ll have to manually ask Vagrant to provision it.
Sounds pretty easy, right? Well, think about it. If you have, let’s say, 2 different computers, you’ll have to copy the cookbooks in the right folder in both machines. That’s not a big issue. But what if we talk about our workplace. Distributing those files to each mate’s computer is not the best idea.
But this is just the initial deployment. What if we want to use an updated version of a recipe? We would have to redistribute again the cookbooks. The chance of not being properly distributed is so high that some people have developed a better way to do this: Berkshelf.
Berkshelf
Berkshelf solves this distribution problem with a very simple approach: in a config file named Berksfile you define the URL of the repository where cookbooks will be searched and a list of cookbooks to search and download (optionally you can indicate the version and even a custom path to where the cookbook is located). Berkshelf will process the config file and download (or update) the cookbooks specified in it. When you provision your Vagrant machine Berkshelf will be hooked so instead of provisioning using the paths specified in Vagrantfile, Berkshelf will handle the location of the cookbooks.
First line tells Berkshelf where should it look for cookbooks. The other lines tell Berkshelf which cookbooks should download and which version.
And so, by just distributing the Vagrantfile and Bersfile, anybody will be able to provision the machine with the desired version of desired applications.
Setting up Berkshelf
Assuming you’ve installed Vagrant, you’ll have to install Berkshelf and Vagrant Berkshelf plugin. Then you’ll have to add this line to your Vagrantfile to enable Berkshelf:
This post was published 12 years ago so it may be outdated.
Recently I’ve started a small project powered by NodeJS and it needs a way to send transactional emails (emails that are sent because an event is triggered). In my case the event is “clicking «I forgot my password» link”. Moreover, I want my project be easily deployed on a PaaS like Heroku so I prefer not relying on utilities like sendmail, or at least making it easy to move from sendmail to a third-party service like Postmark or Sendgrid.
With this two things in mind I looked for the best way to send mails in NodeJS and I found something that maybe is not the best but it’s really easy to set up and use: an open source module named Nodemailer.
Using it is as easy as installing it via npm, creating a transport and calling a method.
Installing
Just run:
[code=bash]
npm install nodemailer
[/code]
I strongly recommend adding it to the dependencies in your package.js, but it is not required.
Creating a transport and sending an email
A transport is just a method to send emails. You can create a transport to send emails via Postmark (for those transactional emails, for instance) and a different transport to send emails via Sendgrid (to send newsletters). The transport is in charge to actually send the email.
If we want to send an email via sendmail we just create the appropriate transport:
[code=js]
// Require nodemailer.
var nodemailer = require( ‘nodemailer’ );
// Message we’ll send.
var sendmail_email = {
from: “SENDER-EMAIL-ADDRESS”,
to: “RECEIVER-EMAIL_ADDRESS”,
subject: “Hello world!”,
text: “Sendmail is working.”
};
// Sendmail transport.
var transport_sendmail = nodemailer.createTransport( “sendmail” );
If you try this your email will probably get marked as spam. That’s one of the reasons to rely on a third-party service. Let’s create a transport to send the emails with Postmark.
Moving from sendmail to Postmark
Sign up for a Postmark account. It’s pretty easy but to sign the emails you’ll need a non-public email address (and to verify it you’ll also need access to its DNS records). I’ve used an email address @sumolari.com to test this. Setting up Postmark is really easy – it’s just following the steps that will be shown after signing up.
Note the API key provided to you by Postmark. This API key will be used as username and password when authenticating to Postmark.
Create a transport:
[code=js]
// Require nodemailer.
var nodemailer = require( ‘nodemailer’ );
// Message we’ll send.
var postmark_email = {
from: “SENDER-EMAIL-ADDRESS”,
to: “RECEIVER-EMAIL_ADDRESS”,
subject: “Hello world!”,
text: “Postmark is working.”
};
As you can see just by changing the transport we can move from service to service which is really convenient (no one wants to be forced to use a service just because it was the one used at the beginning of project’s life cycle).
This post was published 12 years ago so it may be outdated.
Vagrant is a set of tools aimed to create and configure lightweight and portable development environments. The approach is actually pretty simple: Vagrant offers you a way to create config files which are executed later to set up a virtual machine. The interesting point here is that this machine can be (re)created with just one command and can be configured by changing a couple of Ruby lines in the config file.
What’s the point of this? You can have a development environment identical to the one you usually use in any machine with Vagrant installed. If for any reason you break the development environment (installing unstable packages, misconfiguring anything, etc) you can return to the start by running just one command. But it is not limited to development environment: you can deploy your application in a virtual machine with the same software than the production environment.
Setting up Vagrant and VirtualBox
To use Vagrant you’ll need an external software to actually execute the virtual machines. Vagrant works very well with VirtualBox. Although it also works with VMWare and Parallels (via plugins) we’ll use VirtualBox as it is free and good enough. So first download and install VirtualBox and then download and install Vagrant. Installation process is pretty simple in both cases.
Once Vagrant and VirtualBox are installed we can create our first virtual machine by simply running:
[shell]vagrant init[/shell]
In the folder where we want to store the configuration file (called Vagrantfile).
Setting up Vagrantfile
Before being able to run our virtual machine we have to define some parameters, specifically the name of the box and its URL but before that, what’s a box? A box is basically a base image: an image of a virtual machine that has installed an operating system (and many times the required tools to integrate it with a provider – VirtualBox, VMWare and Parallels are usually referred as providers as they are the applications that actually run the virtual machine: Vagrant just takes care of setting them up). Having a box makes having a virtual machine ready faster as you don’t have to install the operating system.
Boxes have a name and a URL but these parameters only affect the local settings of Vagrant: you can choose the name you want for your boxes, as the URL – name mapping is stored only in your computer.
Open Vagrantfile and look for this line:
[ruby]config.vm.box = “base”[/ruby]
There you specify that this virtual machine will use the box “base” as starting point. As Vagrant doesn’t now which box it is you have to specify the box URL so that Vagrant can download it. If you create later a new virtual machine and set up the box name to “base” then Vagrant won’t download the box as it would have downloaded it before.
This line will specify the URL of the box. You can find a list of free boxes in vagrantbox.es. You can also create your own boxes, but that’s beyond this article.
You can also tell Vagrant that you want a certain URL associated with a certain box name by running the command vagrant box add <name> <url>:
Take into account that Vagrantfile is just a Ruby file, so you can modify, read other files, take decisions on the fly and much more. In this file you can set up other settings which are interesting but not essential to run the virtual machine, like port forwarding, folders synced with the host, software to be installed and so on.
Accessing the virtual machine
Once you have chosen a box name and URL you can run it with the command: vagrant up.
[shell]vagrant up[/shell]
This command will start the virtual machine, set up port forwarding, etc. You won’t see any new screen as the virtual machine is run in background. You’ll need SSH to access it, but don’t worry, Vagrant will take care of authentication:
[shell]vagrant ssh[/shell]
Once you are done with the virtual machine you can stop it with:
[shell]vagrant halt[/shell]
If for any reason you want to return to the initial state, removing any change you have done to the virtual machine, you can do it by deleting the virtual machine and recreating it, as easily as:
[shell]vagrant destroy
vagrant up[/shell]
vagrant destroy won’t delete the config file (it’s just a couple of KB) but will remove the image of the machine. So you actually don’t lose your configuration when running vagrant destroy.
If you want to completely remove the virtual machine, after running vagrant destroy just delete the folder with the config file.
This post was published 12 years ago so it may be outdated.
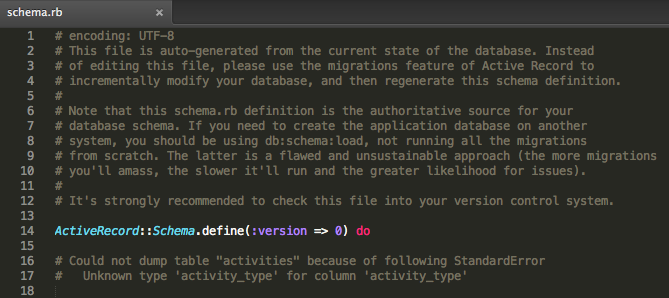
One of the things we don’t want to see when dumping our Database
This year I’ve been learning about MySQL, PostgreSQL and Database security and optimization. One of the features I found useful was creating enumerated types. As they are a good solution for both efficiency and data consistency (only allowing one of the values in the enumeration) I’ve found myself using them in almost any case they fit.
But it wouldn’t be as easy (if it was that easy this post wouldn’t exist). I have been working with Ruby on Rails (an awesome framework to which I’ll devote a couple of posts someday) and its capacity to create the Database from scratch impressed me. But this capacity is also possible due to Active Record migrations. With just a simple command like this you can create the migration to rebuild your Database:
[code]rake db:schema:dump[/code]
But if you use enumerated types you’ll get an error message like this in your migration file:
[ruby]
# Could not dump table “activities” because of following StandardError
# Unknown type ‘activity_type’ for column ‘activity_type’
[/ruby]
Well, it doesn’t look good: Rails couldn’t dump an entire table just because one of the fields used an unknown type (an enumeration). One solution could be modifying each table that used an enumeration but it is a lot of work and we would also lose all the advantages of the enumerated values.
There is a better solution. Rails (3.2.12) allows you to retrieve the scheme in SQL format, rather than in Ruby code. To enable this you just have to edit config/application.rb and add the following line:
Next time you run db:schema:dump you’ll get a file named structure.sql. With this file Rails will rebuild the entire Database, including enumerated values, sequences and constraints.
This post was published 14 years ago so it may be outdated.
Aviso: Este tutorial sólo sirve para la versión de WhatsApp de iOS. Probablemente la forma de cambiar los colores en la versión para Android sea similar, pero no lo puedo asegurar porque no tengo un dispositivo con Android con el trastear.
Cuando escribes en un chat de grupo en WhatsApp, la aplicación asigna automáticamente un color a cada miembro del grupo, de modo que sea fácil saber quién escribe cada mensaje. Sin embargo en algunas ocasiones este color aleatorio no es el más adecuado para el contacto: ¿Un color verde seco para el amor de tu vida y sin embargo un rosa sexy para tu amigo de la infancia? ¡Eso no puede quedar así!
La cuestión es: ¿es posible cambiar los colores que WhatApp asigna a los contactos en los chats de grupo? La respuesta es sí, a pesar de que la aplicación no lo permita por defecto, aunque es necesario haberle hecho el Jailbreak al dispositivo y disponer de una aplicación para gestionar archivos (iFile o similar).
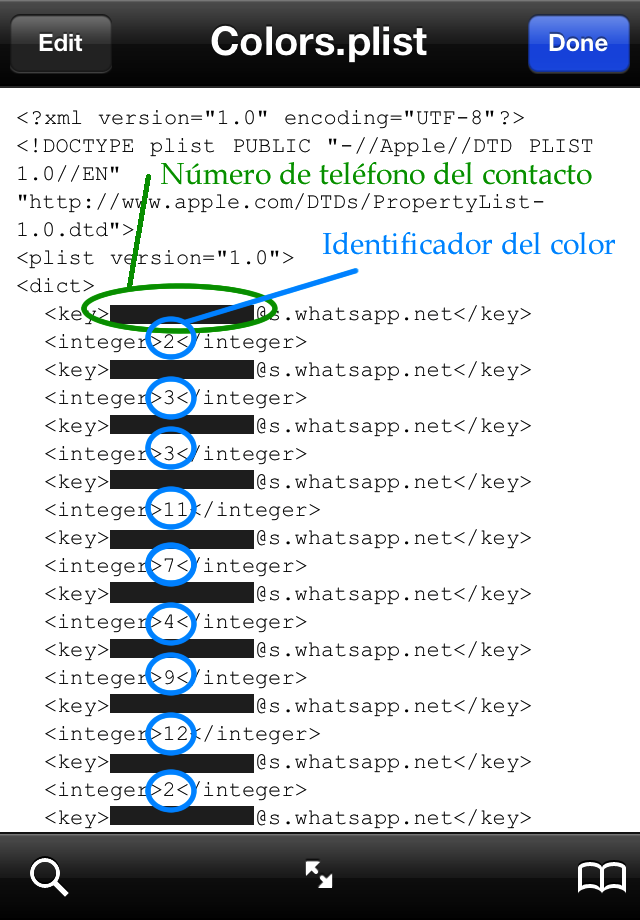
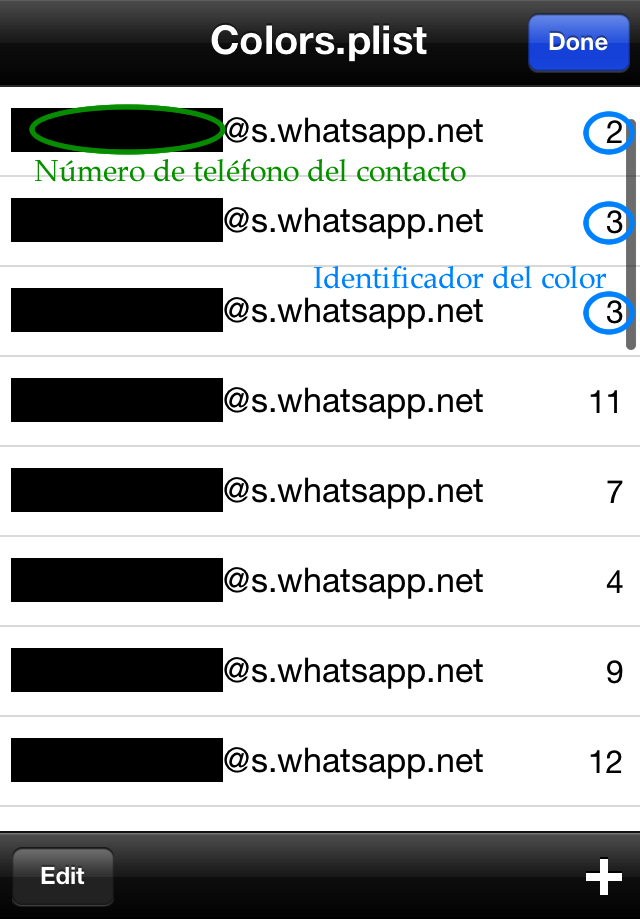
WhatsApp asigna a cada contacto con el que mantienes una conversación, un número entero aleatorio, comprendido entre 0 y 18 (tal vez el rango sea mayor, pero en mi lista de contactos sólo hay números entre o y 18), donde cada número se corresponde a un color diferente, de modo que dos contactos con el mismo número tendrán el mismo color en chats de grupo. Esta lista de parejas de números de teléfono e identificadores de colores se almacena en un archivo dentro de la carpeta de documentos de WhatsApp.
Donde {CARPETA_NOMBRADA_ALEATORIAMENTE} es una carpeta cuyo nombre está compuesto por letras y números aleatorios (seguramente no sean tan aleatorios, pero en cada dispositivo son diferentes). En mi caso la carpeta comenzaba por C4D42785, pero en vuestro caso puede ser completamente diferente. Lo que si será es un nombre largo, formado por muchas letras y números y sin sentido a simple vista.
Dentro de esta carpeta aleatoria encontraremos una carpeta llamada WhatsApp.app. En cuanto veamos una carpeta con un nombre aletorio que en su interior tiene una llamada WhatsApp.app, ya habremos encontrado la carpeta que buscábamos.
Dependiendo del editor que usemos para abrir el archivo, veremos código o una interfaz con las parejas de teléfonos y códigos de color distribuidas a lo largo de una tabla. A continuación teneís un par de imágenes con las dos posibilidades y marcados los números de teléfono y los códigos de color.
Por último queda ver qué color se corresponde a cada identificador. A continuación tenéis una tabla recopilatoria de los 19 colores que WhatsApp ha asignado a mis contactos.
This post was published 14 years ago so it may be outdated.
Ayer Carmen Parra preguntaba en un comentario cómo se pueden guardar los datos introducidos por el usuario en un archivo. Como el proceso es demasiado largo como para publicarlo en un comentario, he decidido escribir este pequeño tutorial.
NSArray, NSDictionary, NSString, NSNumber, NSData y otros
Hay dos métodos sencillos para almacenar un objeto en un archivo y poder recuperarlo cuando nos convenga. El primero no se puede aplicar a cualquier objeto, sino a objetos de algunas clases de Objective-C que responden a dos métodos llamados writeToFile:atomically: y writeToURL:atomically:. El uso de estos métodos es muy sencillo, basta con llamarlos en el momento en el que queramos que el objeto se guarde en un archivo.
A continuación teneís un ejemplo comentado. Básicamente creamos una matriz, le añadimos algo de contenido, la imprimimos, la guardamos en un archivo y nos deshacemos de ella. A continuación creamos otra matriz que lea el contenido del archivo y comprobamos que tiene el mismo contenido que la anterior. El resultado que obtendréis será similar al de la imagen de la derecha.
[obj-c]
NSMutableArray *array = [[NSMutableArray alloc] init]; // Creamos una matriz
[array addObject:@"¡Hola"]; // Añadimos un objeto
[array addObject:@"mundo!"]; // Añadimos otro objeto
NSLog(@"Matriz original: %@", array); // Imprimimos la matriz original
[array writeToFile:@"filename" atomically:YES]; // Escribimos en el archivo filename el contenido de la matriz
[array release]; // Liberamos memoria
NSMutableArray *arrayFromFile = [[NSMutableArray alloc] initWithContentsOfFile:@"filename"]; // Esta matriz tiene el mismo contenido que tenía la matriz anterior
NSLog(@"%@", arrayFromFile); // Imprimimos la matriz recuperada del archivo
[arrayFromFile release]; // Liberamos memoria
[/obj-c]
Del mismo modo que se puede guardar en un archivo un objeto de la clase NSArray, también se puede usar con objetos NSDictionary, NSString, NSData y NSNumber, entre otros. Sin embargo no se puede usar con objetos de una clase creada por nosotros (en la mayoría de los casos).
Clases creadas por nosotros
Para guardar en un archivo un objeto de una clase creada por nosotros, tendremos que hacer que el objeto sigua el protocolo NSCoding. Tras esto, mediante las clases NSKeyedArchiver y NSKeyedUnarchiver podremos guardar en un archivo y leer de un archivo nuestro objeto. Este protocolo tiene dos métodos necesarios: initWithCoder: y encodeWithCoder:.
Vamos a suponer que hemos creado la clase Empleado, que tiene la siguiente interfaz:
Para poder almacenar este objeto en un archivo tendremos primero que hacer que siga el protocolo NSCoding. Modficaremos la interfaz y la dejaremos así:
Básicamente hay dos cambios: hemos indicado que la clase sigue el protocolo NSCoding y hemos definido una serie de constantes que usaremos más adelante y que entenderéis en seguida su utilidad.
Ahora pasamos a la implementación. Esta es la implementación original de la clase Empleado, antes de seguir el protocolo NSCoding:
Ahora vamos a añadir los dos métodos que necesitamos para seguir el protocolo NSCoding. Estos métodos nos permiten archivar nuestro objeto. El método encodeWithCoder: tiene por parámetro un objeto de la clase NSCoder. En este objeto archivaremos las propiedades del nuestro, asignándole a una serie de claves las propiedades del objeto.
Por ejemplo, si queremos hacer que la propiedad nombre se archive en la clave clave, el método tendría el siguiente aspecto:
No todas las propiedades se archivan de la misma forma. Los objeto se archivan a través del método encodeObject:forKey:, los números enteros se archivan con encodeInteger:forKey: y los valores booleanos con encodeBool:forKey:. Las claves son muy importantes, ya que el método initWithCoder: va a desarchivar el objeto usando las mismas claves para acceder a las propiedades, por eso hemos definido una serie de constantes que serán las claves que usaremos para archivar y desarchivar las propiedades.
Nota: Tenéis una lista de todos los métodos para archivar objetos, así como una explicación del proceso de archivar y desarchivar objetos en la documentación de Apple (en inglés).
El método initWithCoder: es muy similar al anterior, sólo que su funcionamiento es el contrario: a partir de un objeto archivado se obtienen las propiedades y se crea un objeto de la clase Empleado (en este caso) con las propiedades que tenía el objeto al archivarse. En este caso enviaremos el mensaje decodeObjectForKey:@”clave” a coder y asignaremos el valor devuelto a la propiedad de nuestro objeto. De nuevo, se usan métodos diferentes para decodificar número enteros, valores booleanos y otros tipos de variables. Nuestro método initWithCoder: quedará así:
Ahora pasemos a crear un objeto Empleado, a guardarlo en un archivo y a comprobar que funciona correctamente. Primero incluímos la interfaz de la clase Empleado en el archivo en el que vamos a crear el objeto, en mi caso, y al tratarse de una “Command Line Tool“, lo incluiré en el archivo main.m. El siguiente código comentado crea un objeto de la clase Empleado, le asigna algunos valores sus propiedades, lo archiva y después crea un nuevo objeto con el contenido del archivo en el que se ha guardado antes el objeto:
[obj-c]
Empleado *trabajador = [[Empleado alloc] init]; // Creamos el objeto
trabajador.nombre = @"Juan"; // Le damos un nombre
trabajador.apellidos = @"García López"; // Unos apellidos
trabajador.edad = 26; // Una edad
trabajador.esEmpleadoDelMes = YES; // Y lo hacemos empleado del mes
NSLog(@"%@ %@ tiene %lu años", trabajador.nombre, trabajador.apellidos, trabajador.edad); // Imprimimos sus datos
[NSKeyedArchiver archiveRootObject:trabajador toFile:@"empleado"]; // Lo guardamos en el archivo empleado
[trabajador release]; // Liberamos memoria
Empleado *trabajadorRecuperado = [NSKeyedUnarchiver unarchiveObjectWithFile:@"empleado"]; // Creamos un objeto a partir del archivo empleado
NSLog(@"%@ %@ tiene %lu años", trabajadorRecuperado.nombre, trabajadorRecuperado.apellidos, trabajadorRecuperado.edad); // Imprimimos sus datos
[/obj-c]
Así se puede guardar un objeto de cualquier clase en un archivo, de forma que puede ser recuperado en cualquier momento. Los objetos más complejos pueden necesitar métodos más complejos a la hora de archivarlos. Del mismo modo no se tienen por qué archivar todas las propiedades si no se quiere.
This post was published 14 years ago so it may be outdated.
Editado: En la primera versión de esta pequeña aplicación había un error que provocaba que en unidades con nombres que incluyesen espacios o caracteres especiales no se borrasen los archivos de forma definitiva. Se ha resuelto y he actualizado el artículo añadiendo el enlace para descargar la última versión en lugar de la que tenía el error. ¡Gracias a Jorosa por el aviso!
Hay cerca de 800MB de archivos "borrados" en este pendrive
Hay veces que uno se sorprende al ver ciertos comportamientos de Mac OS X. Uno de los que menos me gustan es la forma de borrar archivos de un dispositivo extraíble (por ejemplo, un pendrive). En lugar de borrar el archivo, como sería de esperar, o moverlo a la papelera del Mac, lo almacena en una carpeta oculta dentro del propio pendrive que usa a modo de papelera. Si nos fijamos en la papelera de nuestro Mac, veremos que los archivos que hemos borrado del pendrive aparecen en ella, aunque no estén almacenados en el Mac.
El problema radica en que además de no borrar realmente los archivos y dejarlos en el pendrive (ocupando parte de su preciada capacidad), no hay forma de borrar los archivos individualmente de la papelera. Si usamos la combinación Función + Retroceso lo que hacemos es devolver el archivo eliminado a su carpeta de origen en lugar de borrarlo. Estamos pues obligados a vaciar la papelera y borrar definitivamente otros archivos que tal vez no queramos perder todavía.
Así que, algo mosqueado porque esto no haya cambiado ni en Snow Leopard ni en Lion (ni tiene pinta de que vaya a cambiar), he creado una simple aplicación en Automator para “limpiar” los pendrives de archivos supuestamente eliminados.
Cómo funciona
Esto lo aclara todo
Antes de dar los enlaces para descargar la aplicación, veamos cómo funciona. Como ya he dicho, Mac OS X mueve los archivos “borrados” a una carpeta oculta que funciona a modo de papelera. Esta carpeta se llama .Trashes (como de costumbre en OS X, al llevar un punto al principio del nombre, la carpeta es oculta). Si borramos la carpeta .Trashes, borramos todos los archivos que queríamos eliminar pero, ¿cómo la borramos sin pasar por la papelera de nuevo?
Aquí es donde entra en juego el potencial de un sistema basado en Unix. Gracias al comando rm (remove) podemos eliminar archivos o carpetas sin necesidad de pasar por la papelera. Combinando esto con un par de parámetros, concretamente -R (borrar de forma recursiva) -f (sin pedir confirmación) y -d (directorios y archivos) conseguimos vaciar el pendrive de archivos que queríamos borrar.
Obviamente tener que escribir todo esto en la terminal cada vez que queremos limpiar un pendrive de archivos “borrados” no es muy cómodo. Para hacer más cómoda la tarea recurriremos a Automator, ese pobre incomprendido que si bien es capaz de hacer maravillas, la mayoría de los usuarios desconoce incluso su existencia.
Para crear la aplicación abrimos Automator y elegimos crear una aplicación. A continuación arrastramos las acciones para formar el flujo que podéis ver en la imagen de la derecha. Básicamente el flujo es el siguiente:
Solicitamos una carpeta. El usuario deberá seleccionar un dispositivo extraíble.
Establecemos el valor de una variable con la ruta de la carpeta seleccionada.
Leemos el valor de esta variable y se lo pasamos a un script Shell como parámetro (este paso y el anterior supongo que se pueden omitir y usar el resultado del paso 1 como argumentos para el paso 4, pero por pereza no lo he comprobado – si alguien se anima que lo comente en los comentarios).
En el script Shell usamos el comando cd (change dir) para ir a la ruta del pendrive.
A continuación, en el mismo Shell y cambiada la ruta a la que nos interesa, borramos la carpeta .Trashes con los parámetros que he expuesto antes.
This post was published 15 years ago so it may be outdated.
Google Reader antes de activar el nuevo estilo
Google Reader no destaca precisamente por tener el diseño más bonito del mundo. De hecho no ha recibido ningún rediseño desde hace bastante tiempo, a diferencia de otros servicios de como Calendar o Gmail. Si sois de los que utilizáis Google Reader directamente desde su web, sin recurrir a ninguna aplicación que se sincronice con él, agradeceréis este artículo.
Lo que veis en la imagen de arriba es Google Reader tras activar algo de CSS a través de Stylish. Si no tenéis instalado Stylish, podéis hacerlo en Firefox o Google Chrome (en otros navegadores, como Opera o Safari, hay formas diferentes de aplicar los estilos CSS).
Si ya tenéis instalado Stylish, ahora tendréis que instalar los estilos. Al ser un archivo demasiado grande, el autor (Mestiso) no ha podido insertarlo directamente en userstyles.org, pero comparte el código en su página web. Para instalarlo (a través de Stylish) primero accederemos a userstyles.org y haremos clic en el botón Install with Stylish, a continuación editaremos el estilo y reemplazaremos todo el código por el que nos ofrece su autor en su página web. Para ello, en Firefox, mostraremos el panel lateral de Stylish (Ver » Panel lateral » Stylish) y haremos doble clic sobre el estilo Google Reader – 3 Column Reader. Una vez reemplazado el código haremos clic en Guardar y cuando accedamos de nuevo a Google Reader, veremos un diseño mucho más limpio y elegante.
El único inconveniente es que algunas características dejan de ser accesibles, como los patrones. Sin embargo esta función sigue estando activa. Para poder acceder a ella simplemente desactivaremos temporalmente el nuevo estilo (siguiendo los mismos pasos que antes, sólo que en lugar de hacer doble clic en Google Reader – 3 Column Reader lo haremos sobre el icono con una S que aparece a la izquierda del nombre, que tras el doble clic perderá el color, indicando que el estilo está desactivado).
This post was published 15 years ago so it may be outdated.
El Widget de bbPress «View List» que viene por defecto en bbPress 2.0 no tiene demasiada utilidad, al menos aparentemente. Sin embargo ofrece una característica la mar de interesante: podemos añadir cualquier página a ese Widget. ¿Cómo? Ahora lo veremos.
En primero lugar hay que entender cómo funciona el Widget. Toma del objeto $bbp la matriz views, la recorre y genera una lista de vistas disponibles. Por defecto esta matriz sólo tiene una vista: la lista de temas sin respuesta, pero podemos añadir todas las que queramos. La estructura de la matriz views es la siguiente:
[IDENTIFICADOR] => Array
(
[title] =>Título
[query] => Array
( /* Matriz con los parámetros de la consulta a realizar en dicha vista, equivale a query_vars en WP_Query */
)
[feed] => 1 /* Supongo que será si se quiere mostrar o no esta vista en el RSS Feed, pero no lo he comprobado, así que no sé realmente qué es lo que hace */
)
)
[/code]
Interesante, ¿verdad? Pues bien, jugando un poco con esta matriz no sólo podemos crear enlaces que lleven a páginas que muestren sólo determinados temas, sino que podemos hacer que redirijan a cualquier lugar.
[php]
function bbpress_add_rss_to_view_list()
{
global $bbp;
$nombre_de_la_vista = ‘sumolari_bbpress_rss_feed’; // Utilizo este nombre por si en un futuro añaden a bbPress una vista llamada rss_feed o algo similar
¿Qué hace este código? En primer lugar obtiene el objeto $bbp. A continuación definimos un identificador para nuestra nueva vista. Después añadimos a la matriz views un nuevo índice con nuestro identificador y como valor una matriz que tiene por valor del title, “RSS Feed“, por valor del índice query una matriz vacía y por valor del índice feed el número 1. Tras esto verificamos que no nos encontramos en nuestra vista, ya que si así fuera, tendríamos que redirigir la página hacia el RSS Feed de los temas del foro. Por último añadimos esta nueva función a las acciones que se ejecutarán al obtener la cabecera del theme.
¿Cómo generamos el RSS Feed? WordPress lo hace de forma automática, y al ser los foros de bbPress 2.0 artículos de WordPress con post_type personalizados, basta con cargar el RSS Feed indicando el tipo de artículos que queremos ver, a través del parámetro de URL post_type.
Obviamente esta es sólo una de las cosas que se pueden hacer modificando la lista de vistas. El único límite es nuestra imaginación.