CloudFlare, HTTPS and WordPress
Last week I set up HTTPS on this site with CloudFlare’s Flexible SSL so today I’m writing about how did I set it up and what steps you should follow to do so, but first of all let me explain exactly what is CloudFlare Flexible SSL and how it can be free and set up on any website without setting up any SSL certificate. If you already know the details of SSL or aren’t interested in them, just skip to this section.
How does SSL work?
The aim of this post is not explaining the insights of Secure Socket Layer but to understand the pros and cons of Flexible SSL you must be aware of some details, so I will explain a little bit of SSL, if you want to know more you have plenty of information on Google.
SSL is based on public/private key encryption. This kind of encryption relies on some mathematic properties of specially crafted polynomials that basically allows you to:
- Given a public key obtain a special polynomial, applying this polynomial to some data you get an encrypted version of the data that can only be decrypted with a special polynomial obtained from the private key associated with that public key.
- Given a private key obtain a special polynomial, applying this polynomial to some data you get an encrypted version of the data that can only be decrypted with a special polynomial obtained from the public key associated with that private key.
Applying this technique is actually quite straightforward: I will keep my private key to myself and make public my public key (seems pretty obvious), so anyone who wants to contact me privately can and I can contact them privately, too. I just need everybody’s public key and everybody need my public key. And here’s the problem.
If someone is able to intercept the non-secure packet where I send you my public key you might get a compromised public key and you could be victim of a man-in-the-middle attack, rendering our communications non-private. That’s not cool at all.
How is this solved? With your operating system and browser there’s included a small set of public key of different entities, mainly the one of the developers of your operating system and some certificate authority. When you want to communicate with me privately I will send you my public key, and some certificate authority whose public key you know will confirm you (in a secure way) that the key you received is indeed mine. After that you can communicate securely with me.
This is pretty nice, but what’s the problem with all of this? Well, money and setup are the problem. Having a certificate authority validating your public key is not free, and the process is not as easy as setting up something like Flexible SSL (as you will discover really soon).
The magic of Flexible SSL
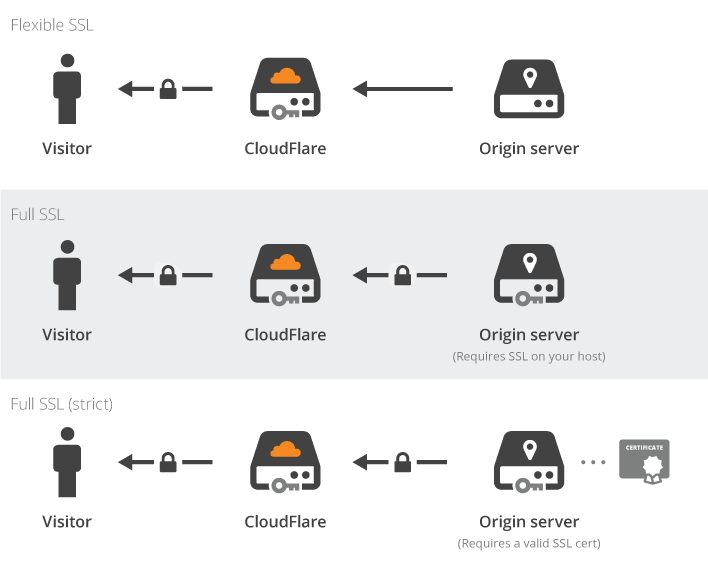
CloudFlare offers you 3 ways to set up SSL on your site:
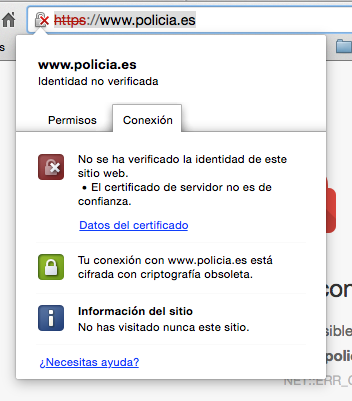
- Flexible SSL: CloudFlare will act as a proxy. Connections between visitors and CloudFlare will be secure (and with a trusted certificate) but connections between CloudFlare and your website will not. It may look like it’s secure but actually it is not. Anyway that’s better than nothing and the easiest to set up (and free).
- Full SSL: connections between CloudFlare and visitors will completely be secure again, and CloudFlare will ignore that your certificate is not backed by any certificate authority so this is more secure than Flexible SSL.
- Full SSL (strict): like full SSL but you will need your certificate validated by some certificate authority, the hardest to set up but also the more secure.
So when you set up Flexible SSL you are actually lying to your users, as their connection is not really secure. You shouldn’t use this but as not having an HTTPS-ready website will have a negative impact on Google’s search result and most sites do not really have data that deserves proper encryption (this website, for instance, does not store any kind of data about the visitors and comments do not require valid data) it may be useful.
Setting Flexible SSL up and fixing WordPress
I will assume your site is already using CloudFlare. Please, note that you don’t have to change your site URL or WordPress URL at any moment. Do not touch those options as changing them may render your site inaccessible (I managed to broke llu.is twice before figuring out how to solve it).
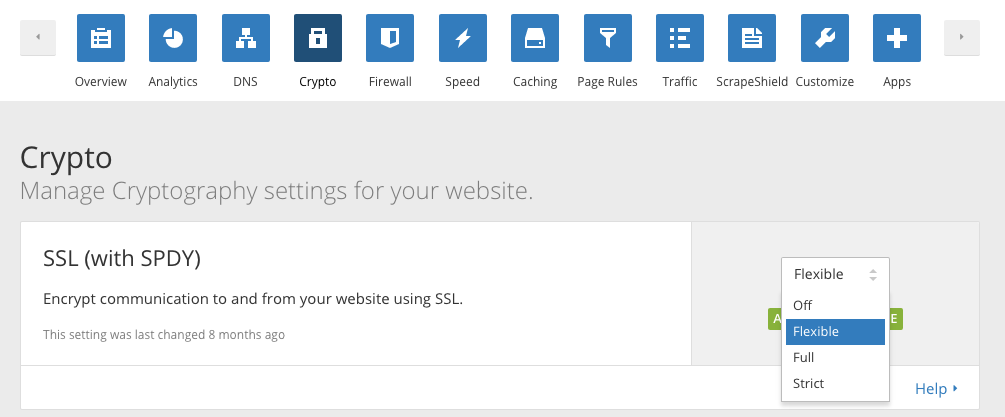
- First thing you must do is enabling Flexible SSL, under Crypto tab in CloudFlare’s admin panel.
- WordPress has a redirection loop in the Admin Panel when accessing through Flexible SSL. You will need this plugin to fix that.
- Browse your website with HTTPS. Everything should be fine. You may notice that some files are not retrieved through a secure connection (like images). That is because WordPress still works with absolute URLs including the protocol. Don’t worry as they load normally even when browsing through HTTPS. If this happened with a JavaScript file (for instance) that would not be the case and you should fix the path to use protocol-relative absolute URLs (that is, instead of http://url…, //url…). Your theme should be using get_xxx_directory_uri instead of bloginfo to load stylesheets (more information here).
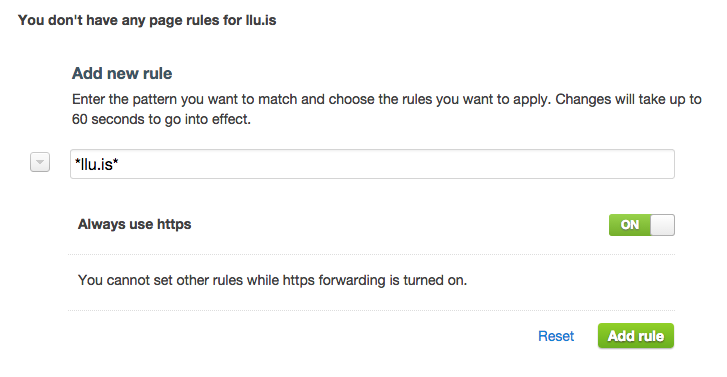
- After checking that your website works properly when loaded through HTTPS you have to make HTTPS by default. To do so go to CloudFlare’s Page Rules tab and add a new rule, using as pattern *yourdomain*, like the screenshot on the right.
No replies on “CloudFlare, HTTPS and WordPress”